The Jeep Cherokee owner’s manual is a little short on calibrating the factory overhead-console compass. The factory service manual has a complete procedure, so I am sharing the useful parts here in a more searchable form.
This procedure and its button names come from the 1997 Jeep Cherokee factory service manual. It applies to the XJ console with U.S./Metric and Step buttons. Other years or swapped consoles may use different labels.
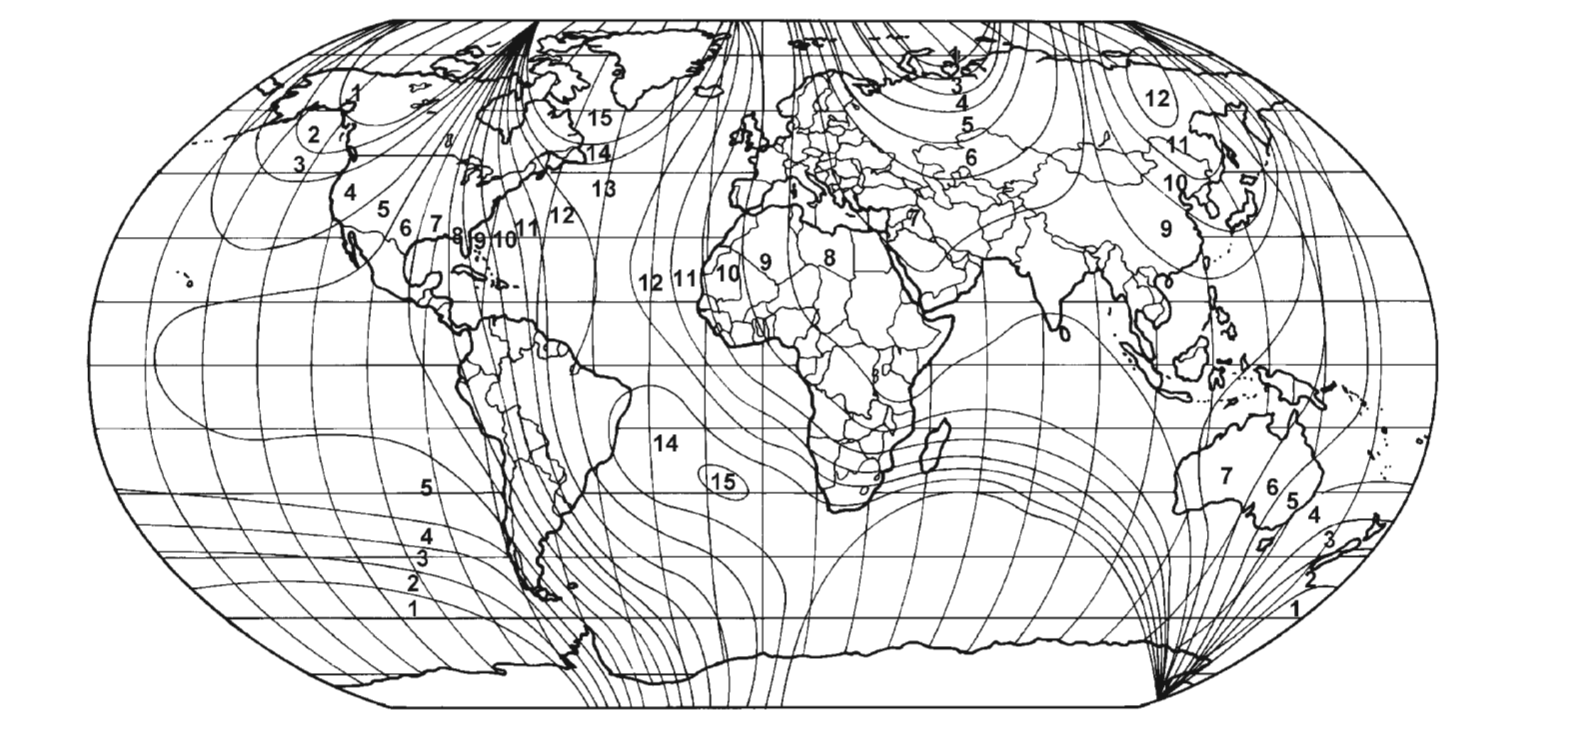
Set the Compass Variance Zone
Magnetic declination, which Jeep calls variation in the manual, is the angle between magnetic north and true geographic north. It changes with location and slowly changes over time. The factory map remains the map that corresponds to the console’s numbered settings; the result is useful for the Jeep’s directional display, but it is not survey-grade navigation. NOAA has a good explanation of magnetic declination if you want to understand the distinction.
- Use the factory variance-zone map to find your location and note its zone number.
- Turn the ignition to On. Press and release Step until the compass and temperature appear.
- Press and hold U.S./Metric and Step together. After about five seconds, VAR will appear.
- Release both buttons. The current zone number will appear.
- Press and release U.S./Metric until the correct zone number appears.
- Press Step to store the setting.
Calibrate the Compass Manually
The compass normally updates its calibration while the Jeep is driven. Manual calibration is useful after installing or replacing an overhead console, after a long loss of power, or when the displayed direction is consistently wrong.
- Start the engine. Press and release Step until the compass and temperature appear.
- Press and hold U.S./Metric and Step together until CAL appears. This takes about ten seconds; VAR appears roughly halfway through, so keep holding both buttons.
- Release both buttons.
- In an open, level area away from vehicles, large buildings, bridges, and other large metal objects, drive at least three complete circles. Take no less than 48 seconds to complete them.
- When CAL disappears, calibration is complete. Confirm the variance-zone setting and check the displayed direction against a known heading.
Avoid magnetic roof-mount antennas and magnetic tools near the overhead console. If CAL remains on, move to a different open area and repeat the procedure. If it still will not complete, the factory manual calls for checking excessive residual magnetism and diagnosing the console rather than continuing to change the variance setting.
More Jeep Cherokee Projects
See my other Jeep Cherokee maintenance and project articles.